Implementing subscriptions with Stripe


This is our last week building a SaaS project with Next.js, Auth0, Vercel and Stripe. We have covered a lot so far! This week we will focus on implementing subscriptions with Stripe. This will allow our users to gain access to all premium courses while their subscription is active.
Extending User schema
In order to track whether a user is currently subscribed or not, let's extend our Prisma user to contain an `isSubscribed` field.
// prisma/schema.prisma

model User {
  id           Int           @id @default(autoincrement())
  email        String        @unique
  courses      Course[]
  stripeId     String        @unique
  isSubscribed  Boolean     @default(false)
  createdAt    DateTime      @default(now())
}
This will be a simple Boolean field to determine whether our user is allowed to see premium content.
When building this feature I initially created a separate subscription model with all the relevant data from Stripe - such as frequency of subscription, next payment date, etc. However, I realised this was just unnecessarily duplicating data that was already available in Stripe, and took a huge amount more code to keep in sync.
Simplifying it down to an `isSubscribed` field greatly reduced the amount of code I needed to write, and bugs I was trying to iron out. It is also the one piece of data that really matters to my application. All levels of subscription see the same content, therefore, all I need to know is should they be able to see it or not!
Let's create a migration for our new changes.
npx prisma migrate dev --name add-isSubscribed-to-user --preview-feature
Subscription options
From Stripe's dashboard navigate to Products and create the different tiers you would like. I have created one for monthly and one for annual subscriptions.

Next we want to display these options in our Next.js application. I have created a new pricing page, and am using the Stripe library to fetch the prices in getStaticProps. Remember this function is called when we build a new version of our application, so will happen very infrequently.
// pages/pricing.js

import initStripe from 'stripe'

const PricingPage = ({ prices }) => {
  console.log(prices)
  // display prices
}

export const getStaticProps = async () => {
  const stripe = initStripe(process.env.STRIPE_SECRET_KEY)
  const { data: prices } = await stripe.prices.list()

  return {
    props: {
      prices,
    },
  }
}

export default PricingPage
Unfortunately, Stripe's price type does not give us the product name - such as Basic or Pro. We could hard-code this in the frontend, but I would like to be able to change the name of the product in Stripe, and have it automatically flow through to the frontend.
To get the product name we are going to fetch the product for each price and create a new plan object that contains an aggregated collection of the bits of data that we care about from price and product.
// pages/pricing.js

export const getStaticProps = async () => {
  // other stripe stuff

  const productPromises = prices.map(async price => {
    const product = await stripe.products.retrieve(price.product)
    return {
      id: price.id,
      name: product.name,
      price: price.unit_amount,
      interval: price.recurring.interval,
      currency: price.currency,
    }
  })

  const plans = await Promise.all(productPromises)
}
Here we are iterating over each price and creating a new promise (request to Stripe for product). We are then using `Promise.all` to send all the requests simultaneously and waiting until we get back all of the data.
At the end of this function `plans` should be an array of aggregated data that looks something like this.
const prices = [
  {
    id: 'price-123',
    name: 'Basic',
    price: 2000,
    interval: 'month',
    currency: 'aud',
  },
  // other pricing options
]
The final file should look something like this.
// pages/pricing.js

import initStripe from 'stripe'

const PricingPage = ({ plans }) => {
  // display plans
}

export const getStaticProps = async () => {
  const stripe = initStripe(process.env.STRIPE_SECRET_KEY)
  const { data: prices } = await stripe.prices.list()

  const productPromises = prices.map(async price => {
    const product = await stripe.products.retrieve(price.product)
    return {
      id: price.id,
      name: product.name,
      price: price.unit_amount,
      interval: price.recurring.interval,
      currency: price.currency,
    }
  })

  const plans = await Promise.all(productPromises)

  return {
    props: {
      plans,
    },
  }
}

export default PricingPage
Creating a subscription
We are going to create a new serverless function to initiate a subscription session. This is going to look very similar to the `charge-card` function.
// pages/api/subscription/[priceId].js

import initStripe from 'stripe'
import { withApiAuthRequired, getSession } from '@auth0/nextjs-auth0';
import { PrismaClient } from '@prisma/client'

const prisma = new PrismaClient()
const stripe = initStripe(process.env.STRIPE_SECRET_KEY)

module.exports = withApiAuthRequired(async (req, res) => {
  const { priceId } = req.query
  const { user: { email }} = getSession(req, res);

  const user = await prisma.user.findUnique({
    where: { email },
  })

  await prisma.$disconnect()

  const lineItems = [
    {
      price: priceId,
      quantity: 1,
    },
  ]

  const session = await stripe.checkout.sessions.create({
    customer: user.stripeId,
    mode: 'subscription',
    payment_method_types: ['card'],
    line_items: lineItems,
    success_url: `${process.env.CLIENT_URL}/success`,
    cancel_url: `${process.env.CLIENT_URL}/cancelled`,
    metadata: {
      userId: user.id,
    },
  })

  res.json({ id: session.id })
})
Then we can trigger this from a function anywhere in our frontend.
import { loadStripe } from "@stripe/stripe-js";
import axios from 'axios'

const processSubscription = async (priceId) => {
  const stripe = await loadStripe(process.env.NEXT_PUBLIC_STRIPE_PUBLIC_KEY);
  const { data } = await axios.get(`/api/subscription/${priceId}`);
  await stripe.redirectToCheckout({ sessionId: data.id });
}
Now we need to extend our stripe-hooks API route to listen for the new subscription event. We will need to determine who the Stripe customer is, and update their Prisma record to say they are now subscribed. These will be the lines we are adding.
// pages/api/stripe-hooks

const stripeId = event.data.object.customer

case 'customer.subscription.created':
  if (stripeId) {
    await prisma.user.update({
      where: {
        stripeId,
      },
      data: {
        isSubscribed: true,
      },
    })
  }
  break
The whole file should look something like this.
// pages/api/stripe-hooks

import initStripe from 'stripe'
import { buffer } from 'micro'
import { PrismaClient } from '@prisma/client'

const stripe = initStripe(process.env.STRIPE_SECRET_KEY)
const prisma = new PrismaClient()

export const config = { api: { bodyParser: false } }

export default async (req, res) => {
  const reqBuffer = await buffer(req)
  const signature = req.headers['stripe-signature']
  const signingSecret = process.env.STRIPE_SIGNING_SECRET

  let event

  try {
    event = stripe.webhooks.constructEvent(reqBuffer, signature, signingSecret)
  } catch (err) {
    console.log(err)
    return res.status(400).send(`Webhook Error: ${err.message}`)
  }

  const { metadata } = event.data.object
  const stripeId = event.data.object.customer

  switch (event.type) {
    case 'charge.succeeded':
      if (metadata?.userId && metadata?.courseId) {
        const user = await prisma.user.update({
          where: {
            id: parseInt(metadata.userId)
          },
          data: {
            courses: {
              connect: {
                id: parseInt(metadata.courseId)
              }
            }
          },
        })
      }
      break
    case 'customer.subscription.created':
      if (stripeId) {
        await prisma.user.update({
          where: {
            stripeId,
          },
          data: {
            isSubscribed: true,
          },
        })
      }
      break
    default:
      console.log(`Unhandled event type ${event.type}`)
  }

  res.send({ received: true })
}
We will need to test this through the app again, as we need to know which customer is subscribing.
Great! Now our users should be able to subscribe, but what about when they want to change or cancel their subscription?
Stripe customer portal
Stripe have once again gone above and beyond and created a customer portal for users to manage their payment details and subscriptions. We need to enable this in the Stripe dashboard and tell it what options we would like to be available.
Go to Settings > Billing > Customer Portal and enable whatever you would like the customer to be able to manage.
You will need to create new pages for `Terms of Service` and a `Privacy Policy`. Make sure you set this to your production URL, as Stripe does not know what your `localhost` is.
Now we can create a new serverless function to initiate the customer portal.
// pages/api/customer-portal

import { withApiAuthRequired, getSession } from '@auth0/nextjs-auth0';
import initStripe from 'stripe'
import { PrismaClient } from '@prisma/client'

const stripe = initStripe(process.env.STRIPE_SECRET_KEY)
const prisma = new PrismaClient()

module.exports = withApiAuthRequired(async (req, res) => {
  const { user: { email } } = getSession(req, res);

  const user = await prisma.user.findUnique({
    where: {
      email,
    },
  })

  await prisma.$disconnect()

  const session = await stripe.billingPortal.sessions.create({
    customer: user.stripeId,
    return_url: process.env.CLIENT_URL,
  })

  res.send({
    url: session.url,
  })
})
This returns us the url of the session, so when we write a function to call this in our frontend we need to manually redirect the user to this URL.
import { loadStripe } from '@stripe/stripe-js'
import axios from 'axios'

const loadPortal = async () => {
  const stripe = await loadStripe(process.env.NEXT_PUBLIC_STRIPE_PUBLIC_KEY)
  const { data } = await axios.get('/api/customer-portal')
  window.location.href = data.url
}
Great, now our users can manage their own payment and subscription settings, but how do we know they have updated or cancelled their subscription?
WEBHOOKS!
Add events to webhook
This logic should look very similar to `customer.subscription.created`. We just want to update the Prisma user with that Stripe ID to have isSubscribed set to `true` if they are updating their subscription and `false` if they're unsubscribing. These are the lines we will be adding.
// pages/api/stripe-hooks

case 'customer.subscription.updated':
  if (stripeId) {
    await prisma.user.update({
      where: {
        stripeId,
      },
      data: {
        isSubscribed: true,
      },
    })
  }
  break
case 'customer.subscription.deleted':
  await prisma.user.update({
    where: {
      stripeId,
    },
    data: {
      isSubscribed: false,
    },
  })
  break
The whole file should look something like this.
// pages/api/stripe-hooks

import initStripe from 'stripe'
import { buffer } from 'micro'
import { PrismaClient } from '@prisma/client'

const stripe = initStripe(process.env.STRIPE_SECRET_KEY)
const prisma = new PrismaClient()

export const config = { api: { bodyParser: false } }

export default async (req, res) => {
  const reqBuffer = await buffer(req)
  const signature = req.headers['stripe-signature']
  const signingSecret = process.env.STRIPE_SIGNING_SECRET

  let event

  try {
    event = stripe.webhooks.constructEvent(reqBuffer, signature, signingSecret)
  } catch (err) {
    console.log(err)
    return res.status(400).send(`Webhook Error: ${err.message}`)
  }

  const { metadata } = event.data.object
  const stripeId = event.data.object.customer

  switch (event.type) {
    case 'charge.succeeded':
      if (metadata?.userId && metadata?.courseId) {
        const user = await prisma.user.update({
          where: {
            id: parseInt(metadata.userId)
          },
          data: {
            courses: {
              connect: {
                id: parseInt(metadata.courseId)
              }
            }
          },
        })
      }
      break
    case 'customer.subscription.created':
      if (stripeId) {
        await prisma.user.update({
          where: {
            stripeId,
          },
          data: {
            isSubscribed: true,
          },
        })
      }
      break
    case 'customer.subscription.updated':
      if (stripeId) {
        await prisma.user.update({
          where: {
            stripeId,
          },
          data: {
            isSubscribed: true,
          },
        })
      }
      break
    case 'customer.subscription.deleted':
      if (stripeId) {
        await prisma.user.update({
          where: {
            stripeId,
          },
          data: {
            isSubscribed: false,
          },
        })
      }
      break
    default:
      console.log(`Unhandled event type ${event.type}`)
  }

  res.send({ received: true })
}
Great, we should now get notified from Stripe anytime a user updates or cancels their subscription via the customer portal, so we can stop showing them premium courses, other than those they have purchased directly.
The `customer.subscription.deleted` event is triggered when the user's subscription expires, not when they click cancel. Depending on the configuration you set in your customer portal settings, this is likely at the end of the period they have already paid for.
We can test this is working through the Stripe dashboard by going to Customers > Subscriptions, clicking the more options dots and selecting "cancel subscription".
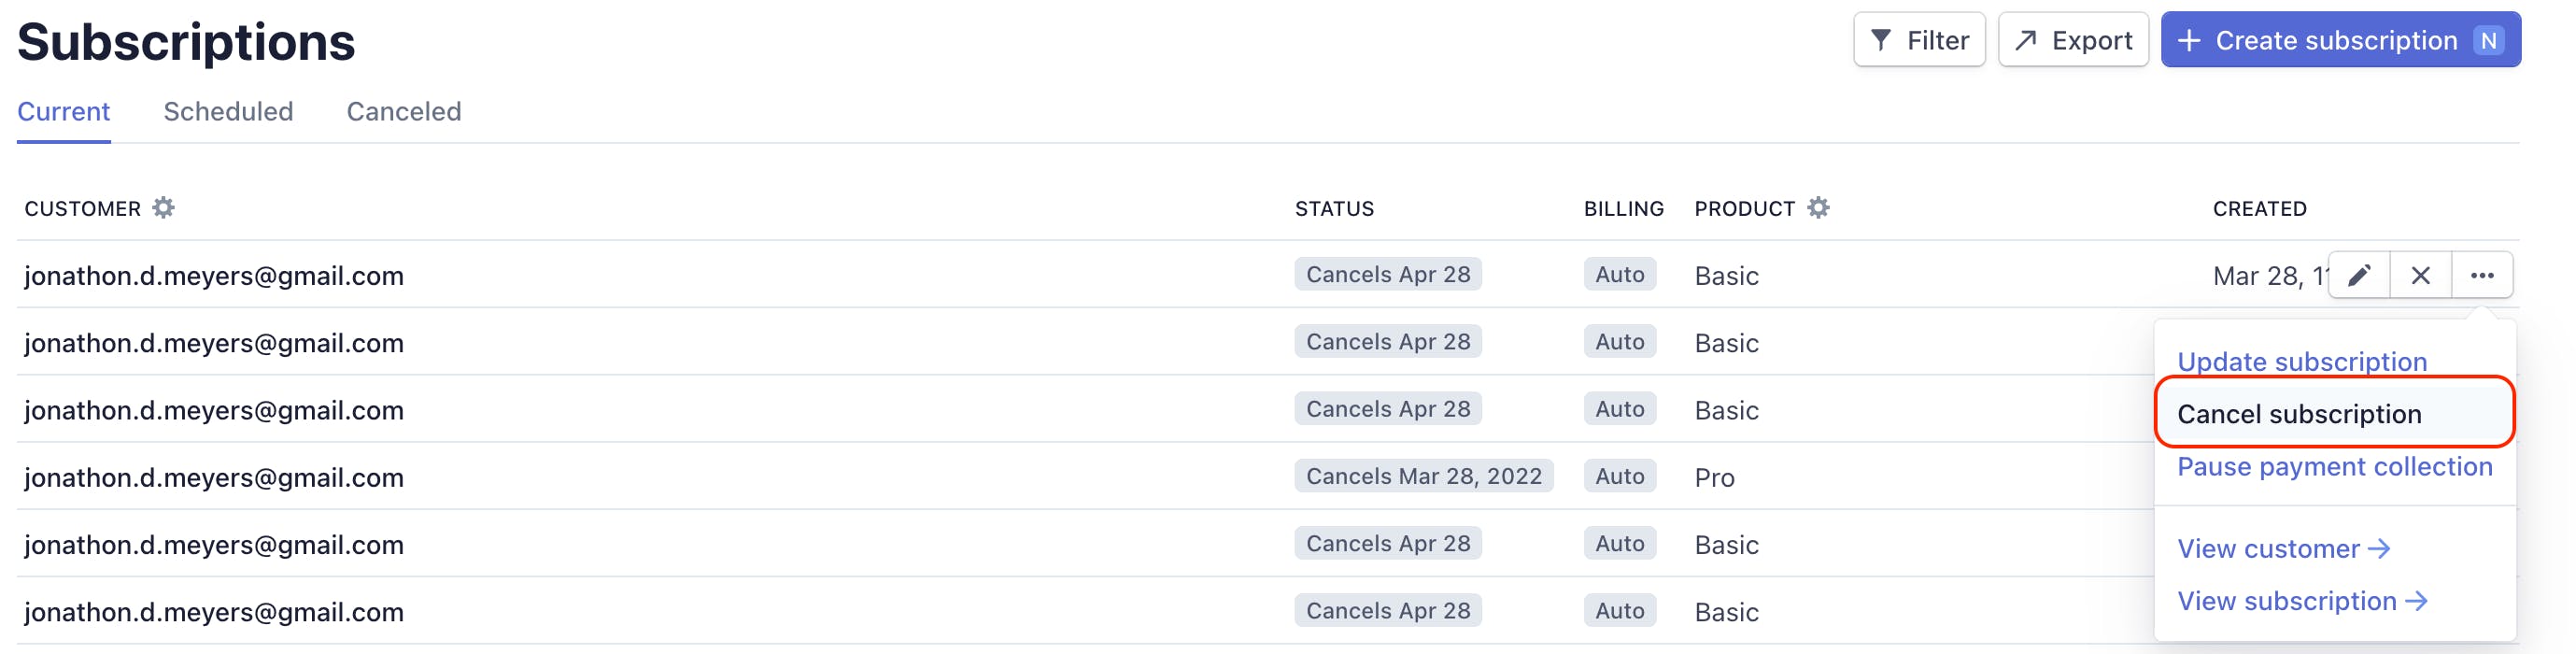
If we select cancel immediately the event should be triggered, our serverless function should be called and our Prisma user should be updated.
This requires the stripe forward command and our next.js dev server to be running.
Production webhooks
Great, now we have this running in development mode but what about our production app?
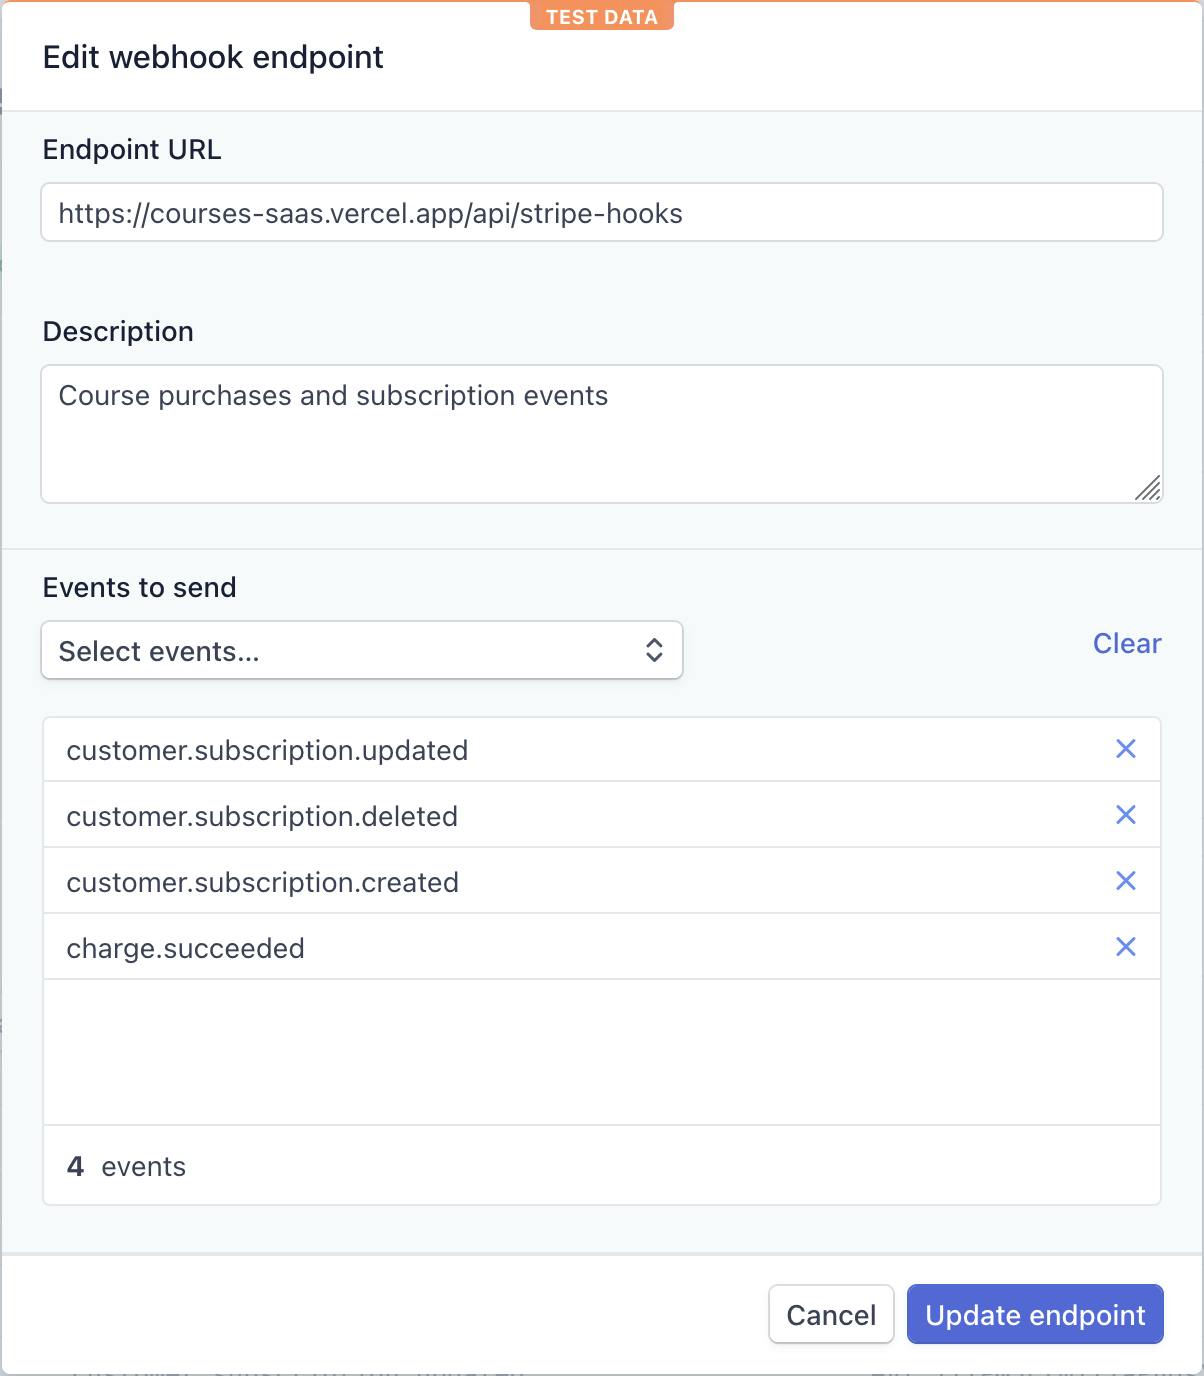
Head on over to the Stripe dashboard and select Developers > Webhooks, and add an endpoint. Here we can tell it which URL to send events to, and which events we actually care about.
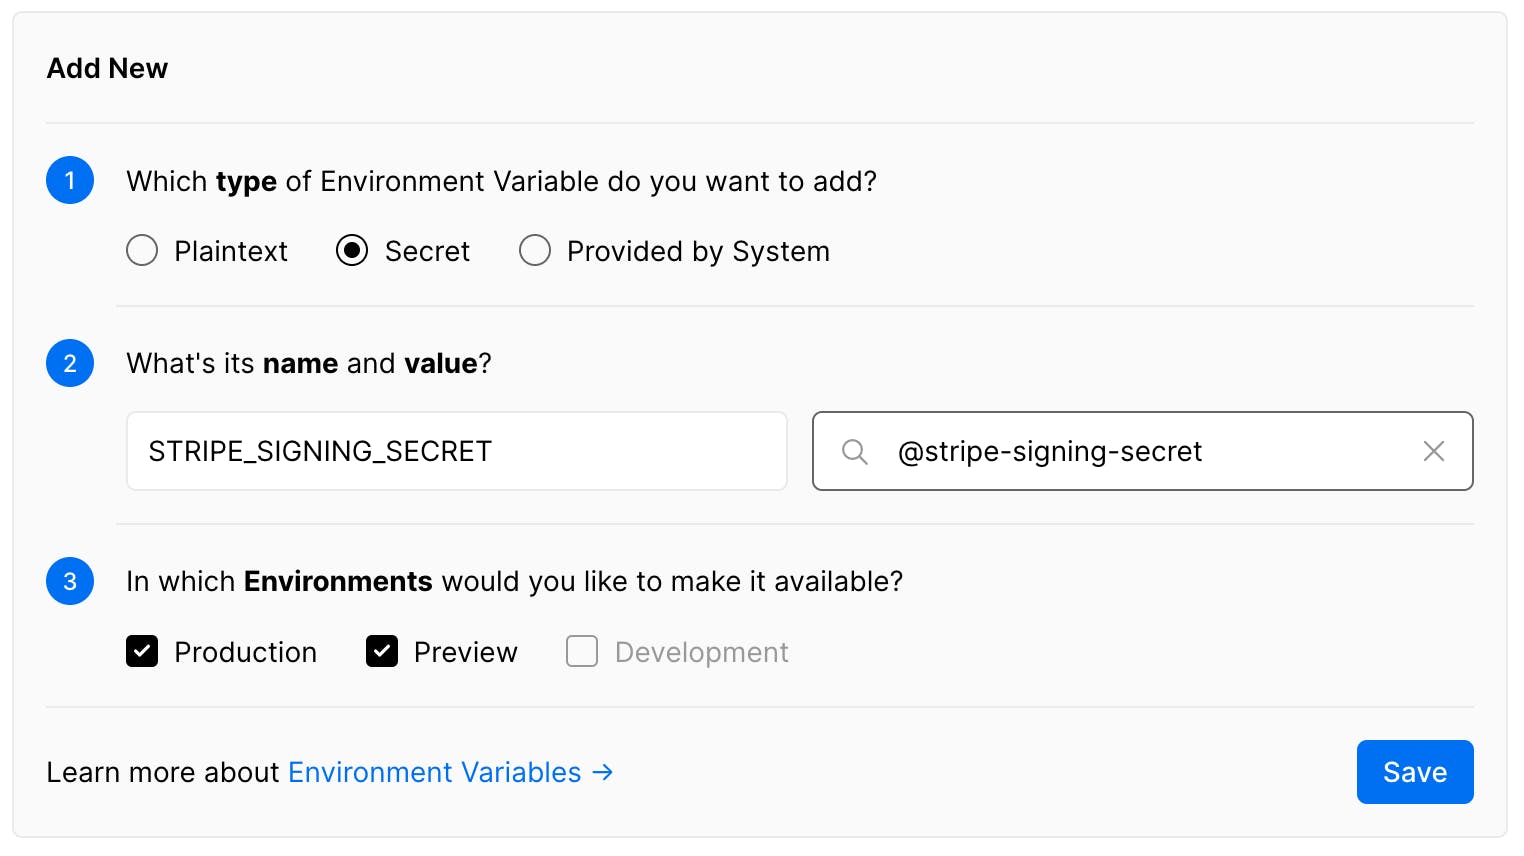
Now within our endpoint dashboard we can copy our signing secret.

And follow the steps from Hosting on Vercel, automatic deploys with GitHub and configuring custom domains to add a new environment variable in Vercel.
Awesome! Now our stripe-hooks function will work in prod too! So how do we actually restrict the user from seeing the premium content in the app?
Gate the premium content
So we have setup all this complicated backend stuff to know when the user has purchased a course and whether or not they have an active subscription, but we haven't actually enforced this in the frontend. There are many ways we can do this but the main thing you should keep in mind is:
YOU CANNOT TRUST THE CLIENT!
A good way to ensure that only premium users can see premium content, is determine what they are allowed to see on the server, and only return the bits for that particular user. An example of this is if I had a video URL link that I only wanted users who have paid to be able to see then I should do that check in `getServerSideProps` and only return the `videoUrl` field if they have an active subscription or have paid for this particular course.
export const getServerSideProps = withPageAuthRequired({
  async getServerSideProps({req, params}) {
    // fetch course and user from Prisma

    const userIsAllowed = course.price === 0 || user.isSubscribed || user.courses.find(course => course.id === lesson.course.id)

    if (!userIsAllowed) {
      course.videoUrl = null
    }

    return {
      props: {
        course
      }
    }
  }
})
Then in the page component itself you could display a video element if they're allowed to view this content, or a buy/subscribe button if they're not.
const CoursePage = ({ course }) => course.videoUrl ? (
  <video src={course.videoUrl} />
) : (
  <button onClick={handleBuy}>Buy course</button>
)

export default CoursePage
A more comprehensive example of this logic can be seen in the Lesson component.
Wrapping up
That's it! We did it! We built a SaaS project in six weeks using Next.js, Prisma, Auth0 and Stripe. Check out the project repo for a more complete working application. What now?
I recommend you take what was covered in this blog series and try to implement something similar but a little bit different. Following steps in a tutorial is a great way to get an understanding of what you can do with a particular library or technology, but the real learning comes from trying to do something you want to do and running into problems!